Vegetarian | Vegan* | Gluten Free* | Lent-Friendly
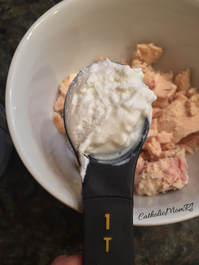
Serves: 1-2 (depending on size of portions) Total Time: Prep time: 10 minutes Notes: Gluten-free if using GF bread. Vegan if using vegan mayo and no yogurt. Ingredients: 1 can of tuna 2 tablespoons of nonfat Greek yogurt 2 tablespoons of mayonnaise 1 tablespoon of relish 1 teaspoon of celery salt Instructions:
One of the things that I missed most when I was pregnant was tuna. While my doctor said that I could have a serving of tuna per week, my nerves were already wrecked with anxiety over the prenatal testing for Down syndrome and the IUGR that I did not want to add any further risk to the baby. One of the first things that I ate when my son was born (after the lentils, yum!) was tuna.
My mom shares this love of tuna fish sandwiches and in fact, she told me that when she was in high school, she literally took a tuna sandwich for lunch every single day. (I know, I’m concerned too about her possible mercury poisoning, but she seems fine!) Unfortunately, the way that I like tuna is with a lot of mayonnaise, which is not good for my health or waistline, especially after having my son and wanting to keep the baby weight off. Luckily, I found a way to enjoy my tuna sandwich without compromising the taste. The first time I made this recipe, I used two tablespoons of nonfat Greek yogurt, relish, celery salt and NO mayonnaise at all. I was fully expecting to hate it since I was so accustomed to eating tuna with mayonnaise. When I tasted it, I was shocked! It was surprisingly good! I even made my mom a sandwich and only told her after she was done eating that it had absolutely no mayonnaise in it. So why does this recipe include mayonnaise? Because it DOES taste better WITH mayonnaise. I use a lower fat, vegan replacement mayonnaise but regular mayonnaise works just fine. The relish really adds a layer of deliciousness and I just love celery salt on tuna fish. Please share this recipe for Tuna Fish Salad with Greek Yogurt on social media. If you post photos of your finished product, tag us in your pics: @CatholicMomRI: Our handle on all social media. Buon appetito!
0 Comments
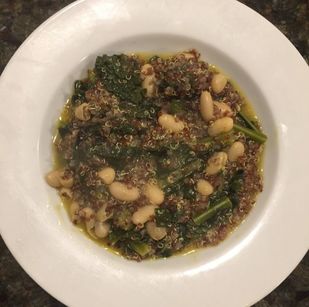 Vegetarian | Vegan | Gluten Free* | Freezable | Lent-Friendly Serves: 3-5 (depending on size of portions) Total Time: Prep time: 10 minutes Cook time: 30-45 minutes. Notes: Gluten-free if using quinoa. Can also substitute gluten free pasta, rice, quinoa, etc... If not gluten-free can substitute orzo, stars, etc... Vegan if omit cheese. Ingredients: 1 bag of kale 1 can of cannellini beans 1 cup quinoa (any variation of quinoa) 32 ounces of vegetable broth Water 2 tsp garlic powder 2 tsp onion powder 1 tbsp basil 1 tbsp oregano salt and pepper to taste Instructions: 1. Cook one cup of quinoa in a large pot according to directions on package. (Rinse quinoa prior to cooking.) 2. Wash kale and pat dry. 3. Heat olive oil in frying pan and add kale when oil is warm. 3. Saute kale with garlic powder and and onion powder and cook for 3-5 minutes. 4. Once quinoa is cooked make sure burner is on low and add in 32 ounces of vegetable broth. 5. Rinse can of cannellini beans and add to pot. 6. Add kale to pot and add basil and oregano. 7. Add in more water if needed and stir thoroughly. 8. Cook on low heat for 20-30 minutes. 9. Better if served immediately. 10. Enjoy! I like to cook healthy. My mom does not always like the things that I make. My husband does not always like the things that I make. It's life. This is one of those meals that I avoided telling them about before I made it. The first time that I made this spin on "escarole and beans", my mother came home to me cooking and said "what are we having for dinner?" and when I said "kale and beans", she literally said to me "Oh my goodness, WHY DID I COME HOME?!" Now, if you know my mother, you know that she is hysterical and while she was entirely serious about her decision to come home, she was not trying to be cruel. "Escarole and beans" is a popular Italian dish and an especially popular dish that is made during the Lenten season, since it is meatless, hearty, easy-to-make and still has a good amount of protein, despite the fact that it is meatless. While I am a fan of escarole and beans and have made it in the past for my family, I wanted to try something different. Typically, I hate kale. No. I loathe kale. There is something about kale that makes me very upset. I know it is the "cool" leafy, green vegetable to eat, but I usually can't stand it. True story: we were at a farmers market last summer and I witnessed a couple eating a bundle of fresh, unadulterated kale while watching a live band. Like the kale was just picked from the field and they were eating it. I felt like I was in the twilight zone. If these people can eat kale like hot, buttered popcorn, then certainly I can grow to like it, too. In this dish, kale is actually, dare I say, good! I have found that the trick with kale is to saute it before putting it in the pot. Trust me, you do NOT want to skip this step. My husband ate a huge bowl and even my mom begrudgingly admitted that this dish was actually delicious. When paired with grated pecorino romano cheese and crusty Italian bread, it is amazing. The best part is that my son loves my 'greens and beans'! Please share this recipe for Greens and Beans on social media. If you post photos of your finished product, be sure to tag us in your pics: @CatholicMomRI (Our handle for all social media).
Buon appetito!
Vegetarian | Vegan | Gluten Free | Slow-Cooker | Freezable
Serves: 8-12 (depending on size of portions) Total Time: Prep time: 25 minutes Cook time: 6-8 hours on high, 10-12 hours on low. Ingredients: 1 bag or 16 ounces of lentils 1 carton or 32 ounces of vegetable broth 24 ounces of water* 2 cups chopped carrots 3 cups of chopped celery 1 small onion, chopped 2 teaspoons turmeric 1 teaspoon black pepper 1 tablespoon dried basil 1 tablespoon dried oregano 2 teaspoons garlic powder 1 can or 28 ounces crushed tomatoes *Lentils soak up a lot of liquid. You may need to add an additional cup or so of water or broth as they cook.
Instructions:
The very first meal that I ate when I came home from the hospital after giving birth to our son was my Nonn'as homemade lentils. It was December 30th and I was nearing the end of my third-trimester. I did not know that these lentils would be one of the last meals I would make before having our son.
While I was scheduled to be induced later in the week, that day I was in full-nesting mode. I cleaned the entire house from top to bottom, did all the laundry, scheduled and finished a ridiculous amount of work ahead of time, made dinner for that evening and prepared food for both New Year's Eve and New Year's Day (lentils and pizza) so that I wouldn't have to cook and could instead "rest" for a couple of days before I was scheduled to be induced. Earlier in the week I finished prepping about a months worth of freezable meals (lentils, again included) that we could eat when our son was first born and I wouldn't have the time nor the energy to make anything. I was exhausted. But, of course, after I got off of the phone with my aunt in Canada, I laid down on the couch to relax after this long day. It wasn't even thirty seconds and boom, my water broke. Thankfully I was laying on my side and immediately jumped off the couch before we had to buy a new one. My husband was just coming home from work and then we sped off to the hospital. When we came home from the hospital a couple days later with our little bundle of joy, lentils were the first thing that I ate and boy, was my body happy that I did. After women give birth, they deserve meals that will nourish them from the inside-out. Our bodies have gone through tremendous stress and pain not only with labor but with the long 9 months (give or take) of pregnancy. In my opinion, lentils are one of the best dishes that I could have eaten right after going through the battle which is pregnancy and childbirth. Here's why: "lentils are an excellent source of molybdenum and folate. They are a very good source of dietary fiber, copper, phosphorus and manganese. Additionally they are a good source of iron, protein, vitamin B1, pantothenic acid, zinc, potassium and vitamin B6."* Plus, lentils are hearty and perfect for these cold, long, winter months. They taste especially good when you eat them with fresh-baked Italian bread and Pecorino Romano cheese. When I was growing up, my nonna would always make lentils for us to eat on New Year's. Italians eat lentils on New Year's in order to bring prosperity, "fortuna" or luck, and wealth to the new year. I love lentils and especially now after having our son, appreciate an easy-to-prep in advance, set and forget in my slow cooker, freezable, healthy meal that my son actually eats and enjoys! This recipe is just one of the many recipes that I can thank my late nonna for. While I will forever miss her, I will also forever appreciate all of the knowledge that she instilled in me and my mother in the time that we were blessed to have her in our lives. Please share this recipe for my Nonna's Homemade Lentils on social media. If you post photos of your finished product, be sure to tag us in your pics: @CatholicMomRI (Our handle for all social media). Buon appetito! 
Vegetarian | Gluten Free* | Under Half-Hour | Child-Friendly
Serves: 4-6 (depending on size of portions) Total Time: Prep time: 15minutes Cook time: 10-15 minutes. Notes: Gluten-free if using tortilla chips that are certified gluten-free. Can also be vegan if using vegan cheese or no cheese. Ingredients: ½ bag of tortilla chips 1 can of black beans 1 can re-fried beans ½ bag of shredded cheddar cheese 1 can sliced jalapeños or 1 can of sliced black olives Barbecue sauce or hot sauce Side salad: lettuce, tomato, avocado. Instructions:
What is better than tacos? Nachos!
When my husband and I were dating, one of our favorite restaurants had amazing barbecue nachos. Since having our son, it has been difficult for us to dine out at restaurants either as a family and especially the elusive date night with just the two of us. Therefore, many of the recipes that I make are those which have been inspired by our favorite restaurant meals that we can enjoy at home. Not to mention, we also save a good amount of money by mostly eating at home. This black bean nacho recipe is something that is not only easy to make but delicious. When served over a bed of lettuce and tomato it can also be very healthy. Let’s also not forget that since this is a meatless recipe it is perfect for every Friday, if you are an all-year meat avoider like me, or for Ash Wednesday and Fridays in the Lenten season! Children, especially toddlers, can be picky eaters and getting nutritious food into their bellies is top priority for parents. Since this black bean nacho recipe is so versatile, I can customize it so that our entire family can enjoy it. I typically put jalapeños on one half of the nachos and then sliced black olives on the rest. That is, if my son hasn’t eaten all the black olives before I can get them on the nachos! You can also use different beans rather than black or refried beans. I hope you and your family enjoy this recipe for black bean nachos. Please share this recipe for Black Bean Nachos on social media. If you post photos of your finished product, be sure to tag us in your pics: @CatholicMomRI (Our handle for all social media). Buon appetito! 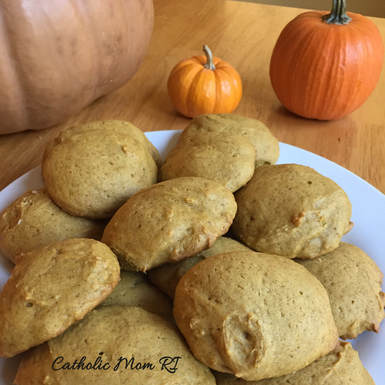
Serves:
8-10 (depending on size of portions) Total Time: Prep time: 20 minutes Cook time: 18-20 minutes. Notes: *You can use alternatives to the flour, sugar and butter. Read below. Ingredients: 3 cups all-purpose flour 1 teaspoon baking soda 1 teaspoon baking powder 2 teaspoons ground cinnamon ¼ teaspoon ground nutmeg ¼ teaspoon ground all spice ¼ teaspoon ginger 1/2 teaspoon salt 1 1/2 cups granulated sugar 1/2 cup butter (1 stick), softened 1 can pumpkin puree 1 large egg 1 teaspoon vanilla extract Substitutions (equal parts): Gluten free flour instead of all purpose flour. Coconut sugar instead of granulated sugar. Coconut oil instead of butter. Instructions:
I love the autumn season and all the treasures that it brings. The leaves begin to turn beautiful colors, the weather gets crisp and gives us an excuse to cuddle up under warm blankets and snuggle by the fire. And the promise of Advent and the Christmas Season right around the corner.
It seems that each fall there is an infestation of ALL PUMPKIN EVERYTHING in the stores and restaurants, and say what you must, but I LOVE it! Pumpkin candles, pumpkin pie, pumpkin lattes, pumpkin bread, pumpkin pasta, you name it—I’m in! For me, it is always bittersweet to say farewell to summer. Pumpkin helps me ease the transition from the warm, long, sunshine filled days to the shorter days and longer, colder nights. Baking is something else that I look forward to when the weather starts to get cooler. One of my favorite recipes that involves baking AND my beloved fruit (I think it’s a fruit?) is PUMPKIN SPICE SUGAR COOKIES! They are as amazing as they sound, especially when they are fresh and warm, straight out of the oven. My son LOVES these cookies and I feel better about giving them to him since they are made partially out of a fruit (fruits have seeds, right?!) and I try to use organic ingredients. I altered this recipe a few years ago from a sugar cookie recipe that I had stashed in my recipes box when I had a craving for “pumpkin something.” Another added benefit to this recipe for Pumpkin Spice Sugar Cookies is that it is very easy to substitute the ingredients. For instance, if you are gluten free, you could substitute equal parts gluten free flour for the all-purpose flour. You could also substitute equal parts coconut sugar for the white granulated sugar. Instead of using butter, you could substitute coconut oil, again, for the same amount. This recipe is very easy to make, and the hardest part of this recipe is waiting for them to cook and cool. While they’re cooking you could always help pass the time by praying the Holy Rosary. Pumpkin Spice Sugar Cookies can be saved in the fridge for up to a week, but we usually devour them way before. ? These Pumpkin Spice Sugar Cookies are a hit in our house and I hope you and your family enjoy them too! Please share this recipe for Pumpkin Spice Sugar Cookies on social media. If you post photos of your finished product, be sure to tag us in your pics: @CatholicMomRI (Our handle for all social media). Buon appetito!
Ingredients:
2 lbs. chicken tenderloin or chicken breast 1 package of gnocchi 2 cups chopped carrot 2 cups chopped celery 2 cups chopped spinach (I use frozen) 1 cup chopped Spanish onion ½ tbsp. dried oregano ½ tbsp. dried basil 1 tsp. garlic powder 1 package of bacon (11 slices) 1 cup unsweetened almond milk* Instructions:
Notes: You can use alternatives to the almond milk like evaporated milk, heavy cream or coconut milk if you don’t mind some sweetness to the soup. Nutritional Information: Per Serving: Calories: 306, Carbs: 8, Fat: 13, Protein: 39, Sodium: 528, Sugar: 3.
Chicken Gnocchi soup is my families favorite soup and we would gladly eat this for lunch and dinner (and maybe even breakfast) several times a week. I especially love it because it cooks entirely in the slow cooker (except the bacon.) This recipe is adapted from Pinch of Yum’s recipe which I have made and is amazing. I altered it by replacing evaporated milk with almond milk, using water instead of chicken broth and completely forgoing cornstarch. I also use more of the vegetables and bacon.
I’ve mentioned how much I love slow cooker, Crock Pot recipes and this chicken gnocchi soup is one of the best. There is nothing better than coming home to a delicious and comforting meal after a long day of work, errands and/or appointments. When I was pregnant with our son, I made a quadruple batch of this chicken gnocchi soup a couple of weeks before delivering him so that we could enjoy it in the difficult newborn months when I would have no time or energy to cook. Therefore, feel free to make double or triple batches and freeze away! I actually have some in the freezer, waiting for us to enjoy later this week! Yay! Another time-saving tip is to chop the veggies and cook the bacon ahead of time so that you can literally throw everything in the pot in the morning before heading off to work, errands or appointments. Please share this recipe for Slow Cooker, Crock Pot Chicken Gnocchi Soup with Bacon on social media. If you post photos of your finished product, be sure to tag us in your pics: @CatholicMomRI (Our handle for all social media). Buon appetito! 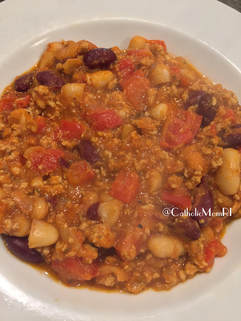 Serves: 6-8 (depending on size of portions) Total Time: Prep time: 15 minutes Cook time: 30-45 minutes Notes: *I try to keep the chili on the less spicy side. You can add more or less crushed red pepper flakes or cayenne if you prefer it spicier. Ingredients
Instructions:
Nutritional Information: Per Serving: Calories: 220, Carbs: 28, Fat: 6, Protein: 17, Sodium: 333, Sugar: 8. Notes: *I try to keep the chili on the less spicy side. You can add more or less crushed red pepper flakes or cayenne if you prefer it spicier. While I love summertime, and am always a little sad to say goodbye, I also absolutely love the autumn season. It makes it easier to bid summer farewell when you have wonderful things to look forward to, like pumpkin picking, cozy fires, warm sweaters, apple cider and delicious and comforting bowls of chili. My mom always made the best chili and I would always burn my mouth by not waiting to grab a bite before it cooled down. While I opt to use ground turkey instead of ground beef in my recipe to keep the fat content lower, I hope that this recipe is almost as good as hers. Another update I made to the recipe is adding in turmeric, a nutritional powerhouse. Turmeric is something that I try to use in as many of my recipes as possible, since one of its health benefits is that it can be anti-inflammatory. This turkey chili is absolutely delicious and something that is easy to prep ahead of time, throw together and have a delicious and healthy meal in no time. What is even better is that it is easy to make a double batch so you have leftovers for the next day, but to also freeze for a later date. When I was pregnant with my son in my third trimester, I made a triple batch of turkey chili and froze it for those first few months when I wouldn’t have the time or strength to make a good home cooked meal. Take it from me, this turkey chili freezes and reheats well. Please share this recipe for Turkey Chili on social media and if you post pictures of your finished product, be sure to tag us in your pics: @CatholicMomRI (Our handle for all social media). Buon appetito! 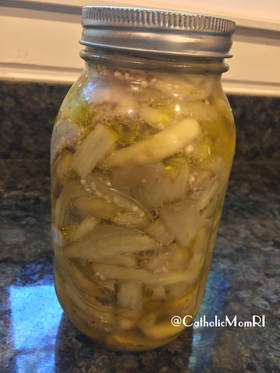 Serves: 20+ (depending on size of portions) Total Time: Prep time: 20 minutes Wait time: 6-7 hours Cook time: 10 minutes Notes: *It is very important to let the eggplant sit under the weight for at least 6-7 hours so that the water can come out. The longer it sits under the weight, the better. Ingredients
Instructions:
Nutritional Information: Per Serving: Calories: 7, Carbs: 1, Fat: 0, Protein: 0, Sodium: 228, Sugar: 1. Notes: *It is very important to let the eggplant sit under the weight for at least 6-7 hours so that the water can come out. The longer it sits under the weight, the better. Our fellow parishioners at our church have become somewhat of an extended family to us. There is an Italian gentleman at our church who reminds me a lot of my late nonno. In fact, we say that he is my son’s honorary great-grandpa (nonno-nonno in Italian.) While my husband and I had a garden this summer, our son’s nonno-nonno has given us a variety of vegetables and fruit that we did not grow on our own this year. He even gave us his homemade wine, which my husband savored to the last sip.
This past Sunday, ‘nonno-nonno’ gave us some “garden treasures” and I was so excited! This time he gave us a bag of fresh eggplant. I immediately thought of my late nonna’s recipe for pickled eggplant or melanzane sott'aceto. My mouth began to water the second I saw that it was eggplant in the bag. I remember my nonna would always search for the slender and long eggplant and admonish any eggplant that was too thick. She said that the longer and leaner the eggplant, the better, as they get more bitter as they get larger. I keep that tip in my mind each time I purchase eggplant at the store. I was even more excited when we got home and I saw that the eggplant that he gave us were ones that my nonna would have picked herself. So, I washed, peeled, sliced, salted and placed the eggplant under weights. (Literally, I used exercise weights on top of the cutting board.) Please do not rush this step. It is important to get as much water out of the eggplant as possible so that it can absorb the vinegar while par-boiling. I chose to slice the eggplant into strips but they are also delicious in slices. While I love to eat this pickled eggplant as is, you can put it on a sandwich, on a charcuterie board, over grilled chicken or on a garden salad. While my son is not a fan of this particular recipe, that just means that there is more for us! 😉 I offer him some each time I eat it in hopes that he will eventually grow to like pickled eggplant, as I love pickling vegetables. Please share this recipe for Pickled Eggplant (Melanzane Sott'Aceto) on social media and if you post pictures of your finished product, be sure to tag us in your pics: @CatholicMomRI (Our handle for all social media). Buon appetito!  Serves: 10-12 (depending on size of portions) Total Time: Prep time: 20 minutes Cook time: 60+ minutes Notes: *You can use ½ cup of applesauce instead of the banana if you aren’t a fan of banana bread. Ingredients
Instructions:
Nutritional Information: Per Serving: Calories: 245, Carbs: 36, Fat: 12, Protein: 2, Sodium: 148, Sugar: 27. Notes: *Stick a toothpick in the center of the bread. Pull it out. If it is dry then the bread is finished. If there is residue on the toothpick, then the bread is not cooked and needs a few more minutes to finish cooking. *You can use ½ cup of applesauce instead of the banana *I adapted this recipe from Mom on Time Out -I wanted more chocolate :) As a parent, I try to get as many vegetables and fruits into my little love’s diet. For the most part, we have been blessed with a good eater. Of course, there are times what I intend on him eating and what he actually eats does not equal up. There are days in which he gobbles up all the food that is served and there are other days I wonder how his growing body can possibly survive on apple, milk, yogurt and puffs alone. This summer, my husband and I decided to grow some vegetables and herbs in a garden. While it was a small garden, it yielded quite a bit of harvest for our family! A staple in any Italian garden is zucchini, so we planted two rows of zucchini and hoped it would grow. Did our prayers get answered! Let’s just say that we’ve eaten quite a bit of zucchini this summer! I began to run out of ideas on what to make with it and while I had never made zucchini bread before, I remember hearing that it can be quite tasty. In the past, my hesitation to make zucchini bread was that I thought it would be both a pain and time consuming to shred the zucchini. Thankfully, I was wrong. It took less than three minutes to grate the entire zucchini. I used the larger holes on a cheese grater and grated it directly in the large bowl I used for the recipe. Just be careful that you don’t grate your fingers by accident-- ouch! This is a recipe that my entire family loved and looked forward to eating. I adapted this recipe from Mom on Time Out since I wanted it to have more chocolate. You can find that recipe here. You can also use ½ cup of applesauce instead of the banana if you aren’t a fan of banana bread. The consistency of the zucchini banana bread was more like cake. For two days after, we enjoyed the left-overs for dessert after dinner. My little love devoured his and I admit that it was his lunch the next day! I felt less guilty allowing him to have it for lunch since 1. I am almost certain that he is getting his two-year molars early (joy!) and 2. There is both a vegetable and a fruit in the cake-like bread. Please share this recipe for Double Chocolate Chip Zucchini Banana Bread on social media and if you post pictures of your finished product, be sure to tag us in your pics: @CatholicMomRI (Our handle for all social media). Buon appetito!  Serves: 4-5 (depending on size of portions) Total Time: Prep time: 15 minutes Marinate time: 3 hours (at least) Cook time: 20-25 minutes Notes: *I always test the meat with a meat thermometer before removing from the grill. See guidelines for cooking temperature for chicken here. Ingredients:
Instructions:
Nutritional Information: Per Serving: Calories: 187, Carbs: 2, Fat: 6, Protein: 36, Sodium: 166, Sugar: 0. Notes: *I always test the meat with a meat thermometer before removing from the grill. See guidelines for cooking temperature for chicken here. I love summer and everything that comes along with it. Okay, almost everything that comes along with it—bugs, spiders and humidity; without those summers in Rhode Island would be almost perfect! Each year as summer begins to wind down and thoughts of fall begin to slowly loom, I start to imagine the cold, damp weather and months of being stuck indoors. While I certainly love autumn and always look forward to celebrating the season, it is always a bit sad to see the summer go. But at least the bugs, spiders and humidity will (hopefully) go away too. During the summer, I love to cook on the grill as much as I can and I especially love cooking fresh vegetables from our garden on the grill. This year, my husband and I started a garden in our backyard. It is a small garden—only a few tomatoes, basil, cucumber, zucchini and jalapeño plants. It pales in comparison to the enormous garden that both of my Nonnos (grandfather in Italian) had but we enjoy it and it has yielded a decent and delicious crop. Since it can get really hot in Rhode Island, cooking on the grill also helps keep the house cool and gives us a chance to enjoy the weather outside. However, when cooking meats on the grill, I am always cautious. According to Dana-Farber Cancer Institute, “high-heat grilling can convert proteins in red meat, pork, poultry, and fish into heterocyclic amines (HCAs). HCAs are chemicals that have been linked to a number of cancers. When fat and juices from meat products drip down to the heat surface on a grill, smoke is produced. This smoke contains potential cancer-causing chemicals called polycyclic aromatic hydrocarbons (PAHs). As smoke rises up past the food, the carcinogens can be deposited on the surface of the meat.” That all sounds scary, right? The good news is that according to Dana-Farber, “marinating chicken, fish and meat has been shown to reduce levels of cancer-causing compounds formed when grilling. When using marinades, thinner is better. Choose marinades that contain vinegar and/or lemon.” (Learn more about safe grilling, here.) This is why I created my Lemon Herb Marinated Chicken Recipe. Please feel free to use this recipe for your next barbeque! Hurry to get the grill out one (or a few) last times before summer is over. My family loves this recipe and it goes wonderful with fresh veggies from the garden! Please share this recipe for Lemon Herb Marinated Chicken on social media and if you post pictures of your finished product, be sure to tag us in your pics: @CatholicMomRI (Our handle for all social media). Buon appetito! |
AuthorWrite something about yourself. No need to be fancy, just an overview. Archives
March 2018
Categories |
